Stopping good vibrations from turning bad
As maintenance methods continue to move away from reactive models — where components are only fixed when they begin to fail — toward more efficient predictive maintenance regimes, techniques such as vibration monitoring are becoming increasingly important.
Vibration monitoring picks up rogue vibrations in moving machine parts, which helps to identify potential problems as soon as they begin to occur. It has become widely used throughout industry and is typically applied to equipment with rotating or reciprocal motion including shafts in motors, pumps and fans or gearboxes and large continuous process machinery.
While production, plant and maintenance engineers are well-versed in the theory and use of condition and vibration monitoring, the techniques are not always applied effectively, which leads to inconsistent measurements, incorrect data and misleading results.
The aim of fitting a vibration sensor is to identify problems as early as possible and correct them before they spin out of control. To do this, sensors must be correctly specified, installed and maintained to provide optimal outcomes. Many vibration monitoring programs, however, never even reach a point where they fail — because they are not implemented in the first place.
This is because some maintenance engineers still favor the reactive maintenance model — because it requires minimal ongoing input and is cheaper to maintain. However, they neglect the fact that when things go wrong, they can go very wrong. Predictive maintenance gives the opportunity to correct minor problems before they escalate to avoid unscheduled breakdowns; the reactive model is more likely to end in catastrophic failure, sudden shutdown and extended downtime. In this case, it is not just individual components that fail, but often secondary systems such as shafts or motors. The repair bill and the lost production time are likely to be very expensive.
Vibration curves
It is recommended to adopt a predictive maintenance routine that uses a range of techniques. The most commonly adopted technique is vibration monitoring. This is often used in conjunction with other methods, such as temperature analysis or oil analysis, but its ability to pick up a range of errors, including imbalance, misalignment, wear and looseness, makes it a key technology. Each problem will have a unique vibration signature, which the monitoring process can spot.
When mounted in key positions on mechanical equipment, vibration sensors offer the options of periodic data collection or continuous monitoring and analysis. While this requires investment, it is a worthwhile option when balanced against the potential cost of downtime.
Vibration monitoring is not a magic wand: To extract maximum benefit from it, it must be properly applied, which is often best done with advice from an expert sensor developer or vibration analyst.
Three key factors that can help to ensure optimal vibration sensor performance are: correct selection, proper installation and the use of refinements to boost the vibration signal.
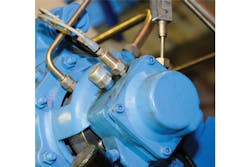
An installed accelerometer
Sensor selection
To ensure optimal results, sensors should be carefully and properly selected according to the particular application.
Modern vibration monitoring sensors work over a wide temperature range, measuring both high and low frequencies with low hysteresis and high accuracy. Stainless steel housings, which prevent the ingress of moisture, dust, oils and other contaminants, ensure that the sensors work reliably under potentially punishing conditions.
Two main types of industrial accelerometers are AC accelerometers and 4-20mA accelerometers. AC accelerometers are typically used with data collectors for the vibration monitoring of more critical or complex machines, such as gearboxes and turbines. In general, 4-20mA sensors are used with programmable logic controllers (PLCs) to measure lower value assets such as pumps and motors.
To specify a vibration accelerometer correctly, engineers must consider factors such as vibration range, frequency span and environmental conditions:
Vibration range and sensitivity: The range of vibration varies depending on the operation. Sensors should be specified to measure the maximum vibration range of the specific application. In a standard application (50 g range), the sensitivity of a typical vibration sensor is 100 mV/g; in low vibration applications (10 g) it is 500 mV/g.
Vibration frequency: It is just as important to know the frequency span as it is the vibration range. Frequency spans are dictated by the fault frequencies of the fastest-turning component in the machinery being monitored; for instance, a high-speed fan will have a wide frequency span.
Temperature: Other than incorrect mounting, the greatest threat to sensor performance is the environment in which sensors operate. High temperatures can affect the operation of the internal electronics, though charge-mode accelerometers are specially designed to work in such conditions.
Other potential factors to consider include: specifying corrosion- and chemical-resistant sensors; using intrinsically safe accelerometers in hazardous environments where flammable gases or combustible dusts could be ignited by a spark; and specifying accelerometers with integral polyurethane cables if they will be exposed to liquids.
Choosing the wrong sensor, such as by overlooking important environmental conditions, or getting the vibration range wrong, is likely to cause poor results or even device failure.
When specifying vibration sensors, it is wise to work closely with a supplier that has appropriate industry experience and knowledge that can advise on the specific needs for a particular industry
or application.
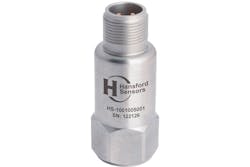
Hansford Sensors’ HS-100 accelerometer
Mounting success
Once the correct sensors have been chosen, they must be properly mounted — a key factor in recording reliable data.
Sensors should be mounted close to the component on a flat, clean surface to guarantee consistent results. Accurate sensor mounting is essential. Mounting a sensor via a drilled and tapped hole direct to the machine housing usually leads to superior results. An effective way to ensure correct mounting, especially if the housing is not flat, is to use a spot-facing kit that includes a tapping drill, taps, tap wrench and spot-facing tool.
To correctly determine defects, such as imbalance, misalignment, wear, mechanical looseness or rubbing, the sensor must be in a position to measure horizontal, vertical and axial movements effectively. When reading horizontal displacement in a pump motor, for instance, sensors should be mounted on two of the motor or pump bearings. For vertical measurements, the sensors should be located on the motor, pump or pump-drive end bearings. Axial measurement uses the same measurement criteria to detect misalignment between the components, such as the motor and fan.
When monitoring a motor, there should also be a solid, continuous metallic path or mechanical transition path linking each measurement point with the structure that supports the load of the motor. In many cases, this will be the bearing outer races.
Once accelerometers have been installed and calibrated, readings must be taken at regular intervals over a period of time to enable accurate trend analysis. This could, for instance, allow a steadily deteriorating condition to be identified.
Enveloping change
Results can also be enhanced with a refinement that pinpoints the exact vibration of interest among every other machine vibration. The method, called acceleration enveloping, is a signal processing technique that filters out low-level, repetitive vibrations that leaves a clean signal that indicates the condition of the part being monitored. It is used in many industrial applications to separate the tell-tale sound of, for example, a malfunctioning bearing from the overwhelming noise from the rest of a machine.
Acceleration enveloping is most commonly used in roller bearing systems but can also be applied to electric motors and gearboxes. It is a key tool that enhances the success of condition-based maintenance (CBM) programs. Identifying a defect once it has already begun causing problems is of no use; by this time, the machine will have consumed more lubricant, expended more energy or even failed catastrophically.
The technique overcomes the limitations of conventional velocity spectrum measurements and detects component failures at the earliest possible stage. The rate of wear can then be monitored and maintenance work planned accordingly.
It is important to understand the information provided by acceleration enveloping may need some skill and experience to interpret. The amplitude of a worsening condition can actually decrease over time, for example, as an imperfection becomes slightly smoother.
This final piece of advice may seem obvious, but it is vital for maintenance staff to pay attention to the readings generated by vibration monitoring equipment. Incredible as it may seem, inconvenient readings will sometimes be ignored or rejected. It is not unheard of for engineers to overlook the evidence of clear warning signs, and then later wonder why catastrophic component failure occurs. Any system is only as good as the people who operate it.
Vibration monitoring is a powerful technique that underpins effective predictive maintenance regimes. However, as with any industrial process, hardware must be correctly specified and installed, and the system treated with care and attention in order to reap maximum benefit from it.


